

sunirefox
-
Numero contenuti
102 -
Iscritto
-
Ultima visita
-
Giorni Vinti
1
Tipo di contenuto
Profili
Articoli
Introduzione alla stampa 3D
Database materiali
Forum
Calendario
Blogs
Gallery
Download
Store
Risposte pubblicato da sunirefox
-
-
Il 29/3/2020 at 09:35, sunirefox dice:
Giusto scusate, non prendetemi in considerazione sul sensore sono stato ottimista , ancora non mi è arrivato, comunque i voltaggi sono identici 6/36/300ma, ho misurato entrata e uscita sulla scheda e cisiamo come tensioni, adesso dovrei averlo in mano e tarare gli 0,8mm , comunque dei miei amici lo hanno installato su x5s e và alla grande , c'è anche da dire che loro hanno il marlin non ufficiale. Comunque appena ce l'ho in mano farò le prove del caso . Per ora sperimento io.
Provato e testato compatobile al 100%
-
Giusto scusate, non prendetemi in considerazione sul sensore sono stato ottimista , ancora non mi è arrivato, comunque i voltaggi sono identici 6/36/300ma, ho misurato entrata e uscita sulla scheda e cisiamo come tensioni, adesso dovrei averlo in mano e tarare gli 0,8mm , comunque dei miei amici lo hanno installato su x5s e và alla grande , c'è anche da dire che loro hanno il marlin non ufficiale. Comunque appena ce l'ho in mano farò le prove del caso . Per ora sperimento io.
-
Cambiate sensore ,io ho preso questo è identico sia di volt ma è capacitivo , no quella schifezza dell'originale
https://www.amazon.it/gp/product/B073SSM2YN/ref=ppx_yo_dt_b_asin_title_o00_s00?ie=UTF8&psc=1
-
provate adesso
-
qualcuno ha lo schema della scheda madre x5sa pro ?
-
provate adesso
-
Tronxy X5S
in Tronxy
a chi servisse datasheet x5sa pro
-
Tronxy X5S
in Tronxy
Whitedavil avevi ragione quella è una skr qui nada de nada per il marlin, finchè và
ho misurato tutte le tensioni di uscita, credo che il sensore sia compatibile al 99% per pro.
-
Tronxy X5S
in Tronxy
Si quindi la possibilità c'è. basta prendere i dati interessanti e inserirli in marlin 2.0.5 a 32 bit... credo
-
Tronxy X5S
in Tronxy
37 minuti fa, Whitedavil dice:Da elettronico con l'hobby della programmazione di cpu a 8bit e 32bit un po' so di cosa parlo. Comunque, se trovi un modo postalo, cosi potrà venire utile a qualcun'altro!
Dà un occhio qui perpiacere dovrebbe esserci la soluzione , visto che te la cavi con la programmazione , se c'è la soluzione allora postala x tutti noi.https://github.com/OrHavraPerry/TronXY-X5SA-Pro-Marlin/tree/master/Marlin-1.1.x
-
Tronxy X5S
in Tronxy
Già qualcosa si muove , sto tizio l'ha messo sulla pro .

-
Tronxy X5S
in Tronxy
Adesso, Whitedavil dice:Da elettronico con l'hobby della programmazione di cpu a 8bit e 32bit un po' so di cosa parlo. Comunque, se trovi un modo postalo, cosi potrà venire utile a qualcun'altro!
Certamente che lo trovo e lo posterò ,mai dire mai l'impossibile divenne realtà ahahah
-
Tronxy X5S
in Tronxy
Ciao un conto e dire che bisogna configurare , un'altro è dire non è possibile che è sbagliato , perchè con le rep rap tutto è possibile basta solo studiarci un pò, e sai che ti dico prima o poi troverò la soluziobe ed il bl touch lo metterò .
-
Tronxy X5S
in Tronxy
Once again Scott Here to see if I can’t help you understand the something else I have seen questions about in the 3D printing community. This Time around I’ll go over the G-code used By Chitu on their F mini control board and other custom made control boards used by Tronxy and several other companies now. This control board comes on the Tronxy X5SA, X5ST, X5S-E2, XY-3 and XY-2 to name a few.
PLEASE NOTE CHANGING THESE SETTING WILL change your printers behavior. Therefore I do not recommend changing settings yourself without understanding what each setting your adjusting does.So To start with G code files can not be written in word you are better off writing then in notepad because it does not leave artifacts in the background. Therefore any time you want to update the firmware you need to either edit the g code you have or start a new notepad document for it.
I am going to do my best to explain each of the G codes in every day terms If I can think of how. Then if you want you canPerò stavo leggendo questo e questo parla di gcode
copy each line into a notepad document and edit and save it. Once saved to the SD card put the SD card into the control board and run that G code file as if it was a print and done. Make sure ever g code file you make has the save g code at the end.
Please not that this is the first G code I have seen that is like this “ M8012 I200” in this case the M8012 is the code then “ I” is the actual settings your adjusting so in the above example it is 200. The this example M8012 is the code for X Y max movement speed then the 200 is the mms. So if you wanted to slow down the max speed you could change it to 120 or 300 to speed it up depending on your printer.Resume on power Lose
M8000 I1 ; used if you have the resume on power lose module installed
M8000 I0 ; used if you do not have the resume on power lose module installed
Stepper Motor Direction
X stepper motor
M8002 I-1 ; current direction
M8002 I1 ; Reverse direction
Y stepper motor
M8003 I-1 ; current direction
M8003 I1 ; Reverse direction
Z stepper motor
M8004 I-1 ; current direction
M8004 I1 ; Reverse direction
E stepper motor
M8005 I-1 ; current direction
M8005 I1 ; Reverse direction
Movement configuration
X axis Movement
M8005 X0 ; print head moves in X axis
M8005 X1 ; Bed moves in X axis
Y axis Movement
M8005 Y0 ; print head moves in X axis
M8005 Y1 ; Bed moves in X axis
Z axis Movement
M8005 Z0 ; print head moves in X axis
M8005 Z1 ; Bed moves in X axis
Speed settings:
speed is in mm/s; acceleration is in mm/ s^2 start speed. When the moving speed exceeds this speed, it takes this speed as the starting speed and begins to accelerate.Otherwise, it is in constant motion at the moving speed
M8006 I120
JERK
M8007 I10 ; Lower this is your getting ringing
ACCLELERATION
Acceleration, the larger the value is, the greater the actual average moving speed is.
M8008 I1000
Axis Steps Per Millimeter
example, 1.8 degree stepper motor, pulley with 20 teeth, tooth pitch is 2.032mm, 1/16 microstepping are (20*2.032)/((360/1.8)*16)
Set X and Y the same
M8009 S0.0125 ; adjust the 0.0125 to correct both at once
independent X,Y stepper motor parameters
M8009 X0.0127 Y0.0127
Z axis
value of each step of Z. The calculation formula: lead /((360/1.8)*16),
M8010 S0.0025
Extruder Calibration
value of each step of E. This value is equal to the 1/3200 circumference of extruder gear. In addition
M8011 S0.010799
Max Movement / print speed
XY movement mm/s
M8012 I200
Z movement mm/s
M8013 I30
extruder mm/s
M8014 I120
Home Speed settings
first home speed
Z-axis
M8015 I8
X-axis and Y-axis
M8015 S30
second home speed
Z-axis returns
M8016 I4
X-axis and Y-axis
M8016 S5
Pre-extrusion before print
Pre- extruded
M8017 I10
max speed of pre-extrusion(mm/s)
Feeding by non-reduction gear, max speed always above 100.
M8018 I20
E max speed
Not sure why this one is here because M8014 does the same thing
M8019 I50
Retract
Distance
M8020 S1.5 ; will set the retract to 1.5mm no matter what the slicer says
M8020 S0 ; Follows slicer retract settingsSpeed
M8033 S8 ; will set retract speed to 8mms
M8033 S0 ; Follows slicer retract speed settings
Filament Diameter
M8021 S1.75
Max hotend temperature
M8022 I260
Min Hotend Temperature for extruder to turn on
M8022 T170
Maximum temperature of hot bed
M8023 I120
Temperature error detection
M8023 T0 ; Enable temperature error detection
M8023 T1 ; Forbidding temperature error detection
Maximum distance of X, Y, Z,
exceeding the distance will cause the buzzer to buzz
X
M8024 I330
Y
M8025 I330
Z
M8026 I439
number of extrusion head Or use of second E stepper driver If the second driver chip set is there. (tronxy E2 versions only)
Set the number of extrusion headat least 1, at most 3 at present
M8027 I1
Whether it is 3 in 1 out nozzle or 2 in 1 out nozzle, these two nozzles share a temperature sensor, share a heating rod
0: not 3/2 in 1 out nozzle 1: 3/2 in 1 out nozzle
M8027 S0
The second extrusion head will be used as Z. For some large equipment, two Z axes will be needed. Therefore E2 can be used as Z axis.
This order will force the number of extrusion heads to be 1 0: double Z double limit mode, the second limit connect to X+,
1£ºdouble Z single limit mode, only connect to one limit switch . if to enable this function, place a tick in front of the command.M8027 Z0
the second extrusion head will be used as Y
if to enable this function, place a tick in front of the command.
M8027 Y0The second extrusion head is used as the first one, because some machines use two motors to feed the wire
If you need to enable this feature, place a tick in front of the command
M8027 E0Heated Bed
M8027 T1 ; enable hot bed
M8027 T1 ; disable hot bed
Advanced Settings
Extra pri after retract
M8028 S0.00 ; Add to the 0.00 to add extra length on the prime length after retract.
Home location
M8029 I0 ; front left
M8029 I1 ; Unilateral maximum point limit
M8029 I2 ; Bilateral limit
M8029 I3 ; Limit in the left rear of the machine
types for limit switch
M8029 T0 , limit switch normally open, when not triggered, the signal level is open
M8029 T1:XYZ limit switch normally closed, when not triggered, the signal level is closed
Filament out Detection
Uses same plus as auto bed level sensor
M8029 D0 ; ban fault detection
M8029 D1 ; enabled fault detection
Limit switch type for filament out detection
M8029 P1 ; same with XYZ limit type
M8029 P-1 ; opposite to XYZ limit type
part cooling Fan
M8030 I0 ; fan is controlled by slicing software
M8030 Ixxx ; setting a temperature that is larger than 0 fan controlled by firmwareColdend Fan
M8030 I0 ; full speed from powering on control board
M8030 I50 T-1 ; allows you to set what speed and temp the coldend fan comes on at
SD card displayed on screen
M8034 I1 ; Yes
M8034 I0 ; No
Auto level point setup
The maximum is 5 as regard to leveling setting, X, Y are floating number, if X, Y are small than 1, then it indicates the corresponding proportion of journey. Otherwise, it indicates the absolute coordinates of X and Y, the unit is mm.
M8035 I3 ; the number of instruction is same with that of point
M8036 X-20 Y0 ; start point
M8036 X50 Y50 ; second point
M8036 X250 Y250 , Third point
M8036 X£» ; ends auto level
Machine type
M8080 I0 ; Cartesian
M8080 I2 ; Corexy
Thermistor type
M8081 I0 ; Ideal NTC 100K 1% 3950 B
M8081 I2 ; corresponding to the type 2 sensor of marlin
Auto leveling setting
M8083 I0 ; ban auto leveling
M8083 I1; enable auto leveling (leveling switch connect Z)
Z Height Offset(TORONXY HAS THE ONSCREEN)
I skipped this because Tronxy has it onscreen. Height difference of Z leveling limit = Z zero position-Z position for leveling limit. 0: forbid deviation, the route of Z is determined by¡°set Z as zero¡±,the printed
G code doesn’t need the automatic high leveling order. It's recommended to use this mode. Non 0:Z is automatically determined when the leveling limit is triggered. Under this mode,
G29 automatic leveling order must be after the return to zero of G28 and before begin print. If the extrusion head is near to main board during limitation, the value is positive.
M8084 Z4
Boot Screen
The minimum is 100ms,the maximum is 6000ms
M8085 I500
standby mode to shutdown
This function can only be used for the equipment installed with the power module. The unit is second(s). When the value is 0, it indicates forbidding the function of shutdown after standby.
M8085 P0
Max Fan speed
Max 256 with more noise, which can be adjusted through this parameter
M8489 I256
Disable steppers and turn off all heating after printing
M8489 P0 ; Turn off all
M8489 P1 ; G Code Controlled
PID
I have not used these one will more than likely be hotend the other the bedM301 P22.2 I1.08 D114 ; enables PID
M303 E0 S150 C5; enables PID
Laser Engraver
M8520 I0 ; do not support the laser engraving
M8520 I1 ; support laser engraving, there are more buttons inside to set speed
Wifi Setup
Replace the word networkname with your network's name leaving the quotation marks, Replace the word Password with your networks password leaving quotation marks.
M9005 '"Networkname","Password"'SAVE
MUST DO THIS IN EVER G CODE SET YOU SEND THE PRINTER
M8500
below is an example of a Gcode I personally used to do basic update to the X5SA.
;Speed settings: speed is in mm/s; acceleration is in mm/ s^2
;start speed.When the moving speed exceeds this speed, it takes this speed as the starting speed and begins to accelerate.
;Otherwise, it is in constant motion at the moving speed c3d
M8006 I120
; ==================================
;
;JERK
;
;maximum speed while turning a corner. There there will be a large number of reciprocating motion while filling.
;The noise is loud while this value is large. When the value is small, the speed is slow c3d
M8007 I10
; ==================================
;ACCLELERATION
;
;acceleration, the larger the value is, the greater the actual average moving speed is.
;However, the noise is loud. The actual speed is small when the value is small c3d
M8008 I3000
; ==================================
;MAX MOVEMENT / PRINT SPEED.
;
;maximum speed of various parameters. In order to ensure the stabilization of the machine,
;please make settings according to the measured results
;maximum speed of XY movement mm/s
M8012 I200
; ==================================
;maximum speed of Z movement mm/s
M8013 I30
; ==================================
;maximum speed of the extruder mm/s
M8014 I120
; ==================================
;Z-axis home speed.When using makerware software,the home speed will be ignored while slicing,
;because gcode specified the home speed
;first home speed when Z-axis returns to zero, higher
M8015 I8
; ==================================
;first home speed when X-axis and Y-axis returns to zero, higher
M8015 S30
; ==================================
;second home speed when Z-axis returns to zero, slower
M8016 I4
; ==================================
;second home speed when X-axis and Y-axis returns to zero, slower
M8016 S5
; ==================================
;Thermal Protection.
;
; Tronxy Has this turned off
;Forbidding temperature error detection. The default temperature error detection will pop up the warning when the temperature
;sensor is not well plugged in or the heating power is too small. Strongly suggest not forbidding this function
;1: Forbidding temperature error detection 0: Enable temperature error detection
M8023 T0
; ==================================
;MAX TRAVEL (adjusted because I have bed lowering installed).
;
;maximum distance of Z
M8026 I439
; ==================================
;the duration of the boot screen,the minimum is 100ms,the maximum is 6000ms c3d
M8085 I500
; ==================================
M117 PRINTER NOW CUSTOMIZED
;SAVE
;
;¡¾Save command¡¿ This parameter must not be less, otherwise all parameters can not be saved to the device
;save the configuration
M8500 -
Tronxy X5S
in Tronxy
si sto aspettando la cinghia chiusa, ho già preparato gli assi per la cinghia, però in alto questo non guasta, comunque credo che il firmware si possa cambiare cioè sbloccare la eprom però ancora nn sò come si fà, ma per il bl touch spero che basti il gcode
-
Tronxy X5S
in Tronxy
Io stavo leggendo qui e mi pare che tutto si possa fare , ma se non erro credo che basti un gcode :
-
Tronxy X5S
in Tronxy
2 minuti fa, I3D&MLab dice:Bel lavoro @Whitedavil ! 🙂
Quindi che mi dici si può fare ?
-
Tronxy X5S
in Tronxy
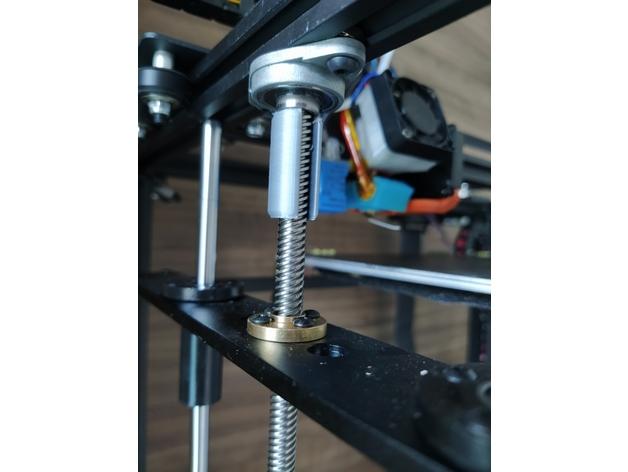
trovato su thi, tradotto alla buona per tutti coloro compreso me che sbotta sempre per gli assi z prima della grande modifica. Recita questo:
Il letto Tronxy X5SA continua a perdere l'allineamento tra le due viti Z ... E a volte piace schiacciare l'ugello sul letto. Questi semplici tappi a Z funzionano come un incantesimo per ripristinare l'alligamento, si alzano dal letto fino a quando gli stepper iniziano a saltare e il gioco è fatto! (il rumore non è così elegante, ma innocuo ...) Per la mia stampante, TronXY X5SA 24v 2019 l'altezza del tappo era di 28,5 mm ... Basta allineare il letto, spostare l'ugello per toccare il letto ... e misurare lo spazio vuoto e ridimensionare l'altezza di stampa allo "spazio vuoto - 1mm" ... -
Tronxy X5S
in Tronxy
-
Tronxy X5S
in Tronxy
-
Tronxy X5S
in Tronxy
1 ora fa, Whitedavil dice:Io ho il bltouch e ti posso aiutare a configurare il fw, se sulla tua elettronica è possibile. Ma il supporto te lo devi creare e stampare. Io sulla mia ho montato un estrusore direct per cui non ti posso passare un supporto.
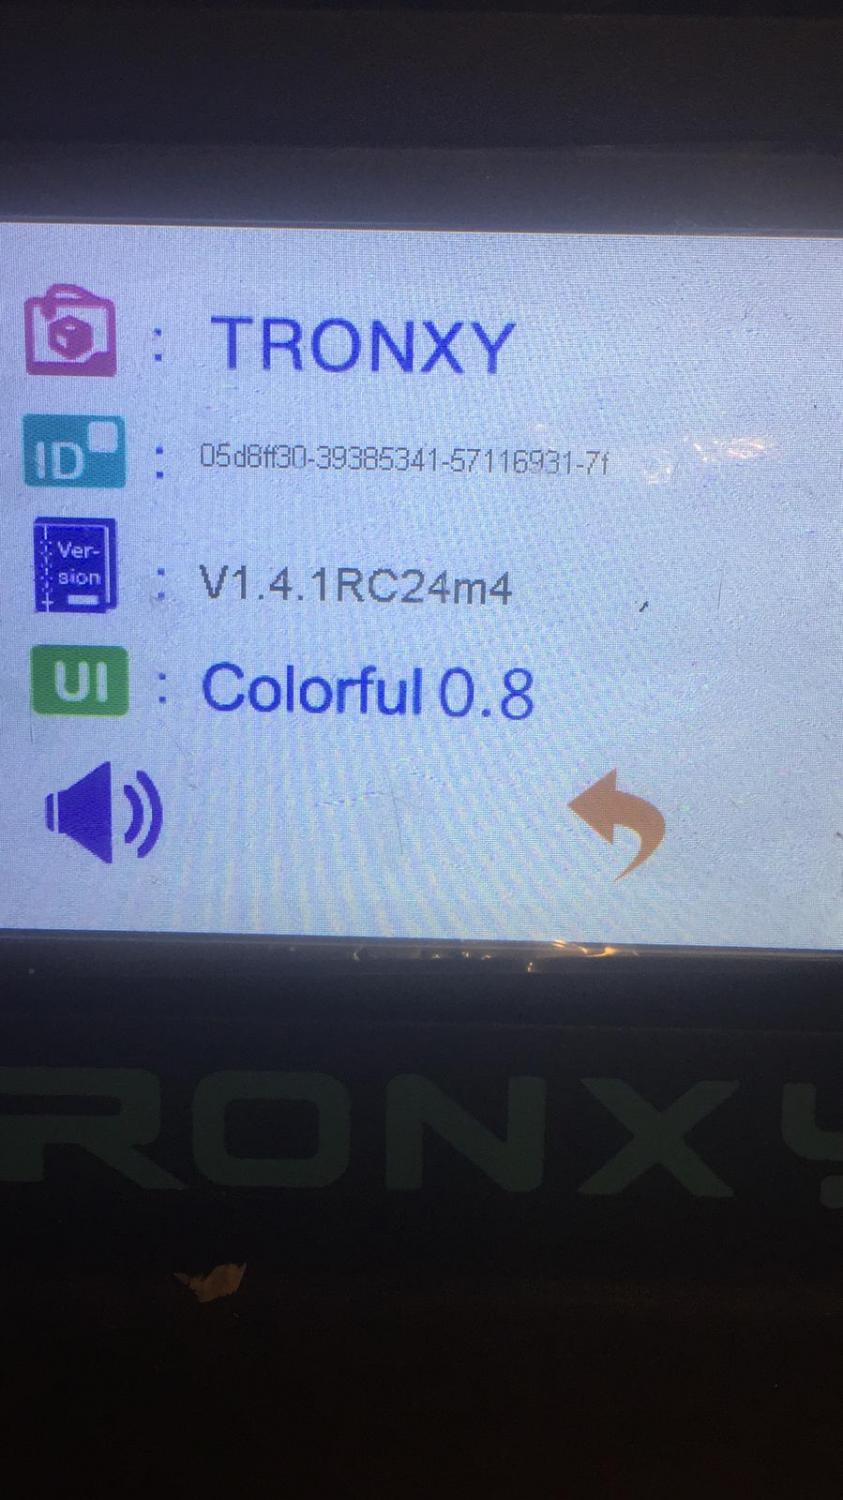
Si grazie di cuore, ho X5Sa pro 330x330x400, scheda 32 bit Arm3 driver 2256 , adesso mi metto alla ricerca del stl bltouch,
-
Tronxy X5S
in Tronxy
2 minuti fa, Whitedavil dice:Auguri ad integrare quel sensore, non so se hai notato ma 18mm di diametro. Il flusso lo regoli in base a come vengono le stampe, un 10% in più non è poco...
Dici che è difficoltoso da integrare? ho anche 2 bltouch disponibili però ancora nn ho informazioni a riguardo su bl touch e poi non trovato neanche il pz da stampare x adattare il bltouch, hai per caso 1 dei 2 o tutti e due?
-
Tronxy X5S
in Tronxy
stampa molto bene ma devo lavorare sulla retrazione, ancora un pelino e poi è perfetta reatrazione 8,40, flusso di riempimento sta a 100 ora io ci metterei 110 cosa mi consigliate?
-
Tronxy X5S
in Tronxy
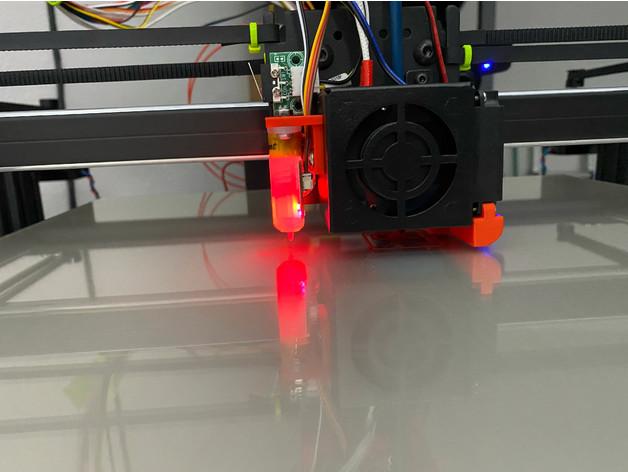
comunque il fanduct io l'ho stampato in petg e anche da un pò di tempo per il momento nn ha ceduto sperem
Pezzi di ricambio
in Tronxy
Inviato
stampa su vetro. per chi diceva che non stampa su letto caldo, per chi diceva che ha dato problemi. và alla grande.